I faced this issue while assisting someone setting the print layout of a document. On screen, everything appeared fine, but when we began printing on a physical page the text was far too close to the edges of the sheet. It was by no means a professional appearance.
My first assumption was that changing the margins would be buried deep in the settings. Apparently, it is just a minute if you know where to look.
So, if you are wondering how to change margins in Google Docs, you’ve come to the right place. When you are writing a school project, a business report, creating your resume or formatting content for printing, setting the margins is hassle-free and fast.
Whether you’re using Google Docs on your desktop or your phone, I would take you through every way possible.
Why Change Margins in Google Docs?
Margins are one of those seemingly little things that can entirely transform the way your document looks.
These problems with their beat, here’s a few common adjustments they make:
- The submission document should follow the formatting rules of a school or office.
- You would like more room for printing.
- The text placement is a bit close to the edges of the pages.
- You want extra space for jotting down notes or comments.
- You want to squeeze a little bit more text onto each page.
The default margins are used by most documents, but there are so many cases in which changing them makes everything tidier.
How to Edit Margins in Google Docs
If you’re using Google Docs in your browser, this is the easiest method.
1: Open Your Document
Go to Google Docs and open the document you want to edit.
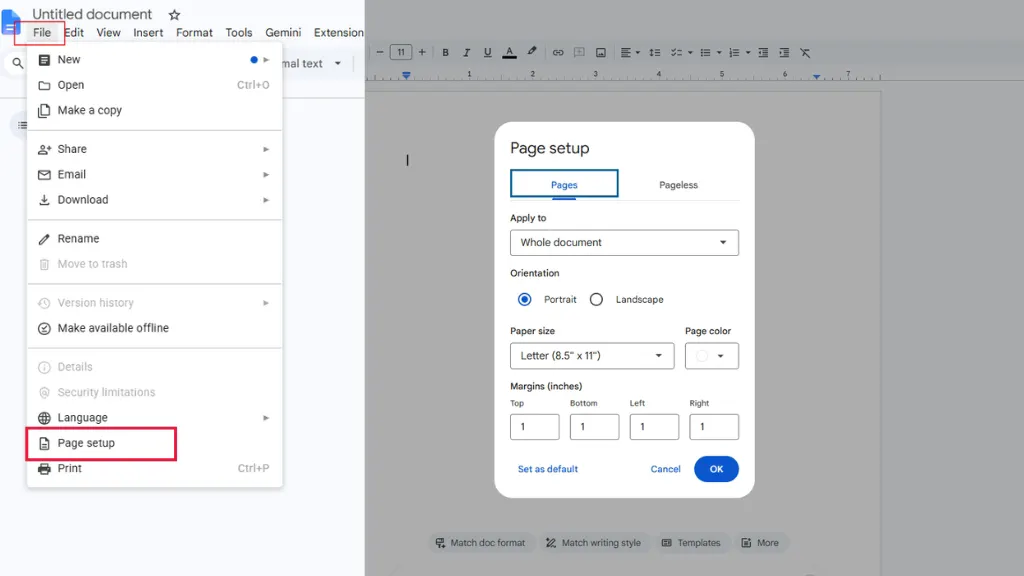
2: Open Page Setup
- Click File from the top menu.
- Then choose Page setup.
- A new window will appear.
3: Change the Margins
You’ll see four margin boxes:
- Top
- Bottom
- Left
- Right
Enter the measurements you want for each side.
Google Docs usually uses inches, depending on your region and account settings.
4: Save Your Changes
Click OK.
If you’d like every new document to use the same margins, click Set as default before saving. Your document updates immediately.
Another Easy Way: Use the Ruler
Sometimes you don’t need exact measurements. You just want to make the page look right. The ruler at the top of Google Docs is perfect for that. Click and drag the gray margin markers left or right. As you move them, you’ll see the text adjust in real time.
I usually use this method when I’m making small layout changes because it’s much faster than opening Page Setup every time.
Conclusion
Editing the margins on Google Docs is one of those little things that is fairly important and affects the appearance of your documents. When you want to prepare a report, print an assignment, or simply format the layout in your way, it only requires a minute to change margins.
On a computer, you use either Page setup for exact measurements or the ruler for quick adjustments. After you do it a couple of times, it becomes second nature and the documents will look so much better from the outset.